3019 Shannon Lakes North, #203 Tallahassee, FL 32309
Find your Weatherstem unit:
API V2
Looking for help with the API V1? Click here
What if your website or app could interact with your users based on weather conditions? Now it can!
Weatherstem is pleased to announce the Alpha release of our API Version 2.
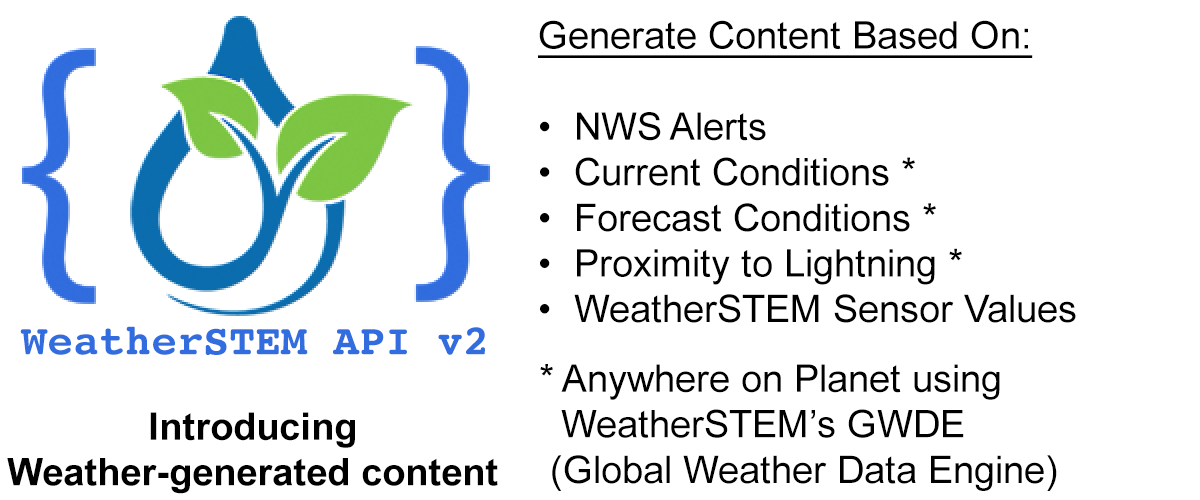
The API represents a simple yet powerful way to add weather intelligence to your web or mobile content offering the ability to tailor it based on current or forecast weather conditions anywhere on the planet.
Once you learn some simple fundamentals, the API is fun and easy to use and will let you interact with your users based on weather conditions.
Go through the tabs on this page to learn how the API works and you'll be up and running in no time!
If you have any questions or need any help, feel free to reach out to us at api@weatherstem.com. Make sure to share with us all the cool things you build with the API Version 2!
The first thing you'll need to do to use the API is include the Weatherstem V2 API JavaScript and CSS libraries in your page.
JavaScript
<SCRIPT src="https://apiv2.weatherstem.com/apiv2.min.js"></SCRIPT>
This SCRIPT tag should be placed at the end of your document but before the closing BODY tag.
The Weatherstem V2 API requires jQuery and we load it if a prerequisite version isn't available in your page already.
CSS
<LINK rel="stylesheet" href="https://apiv2.weatherstem.com/apiv2.min.css"/>
This LINK tag should be placed within your HEAD element after the TITLE element.
In order to use the API, you need to create an API key.
You'll need a Weatherstem account to do this.
Weatherstem accounts are free and you only need a valid e-mail address to create one.
Accounts can be created in our mobile app for iOS or Android, or you can create one on the web by clicking here.
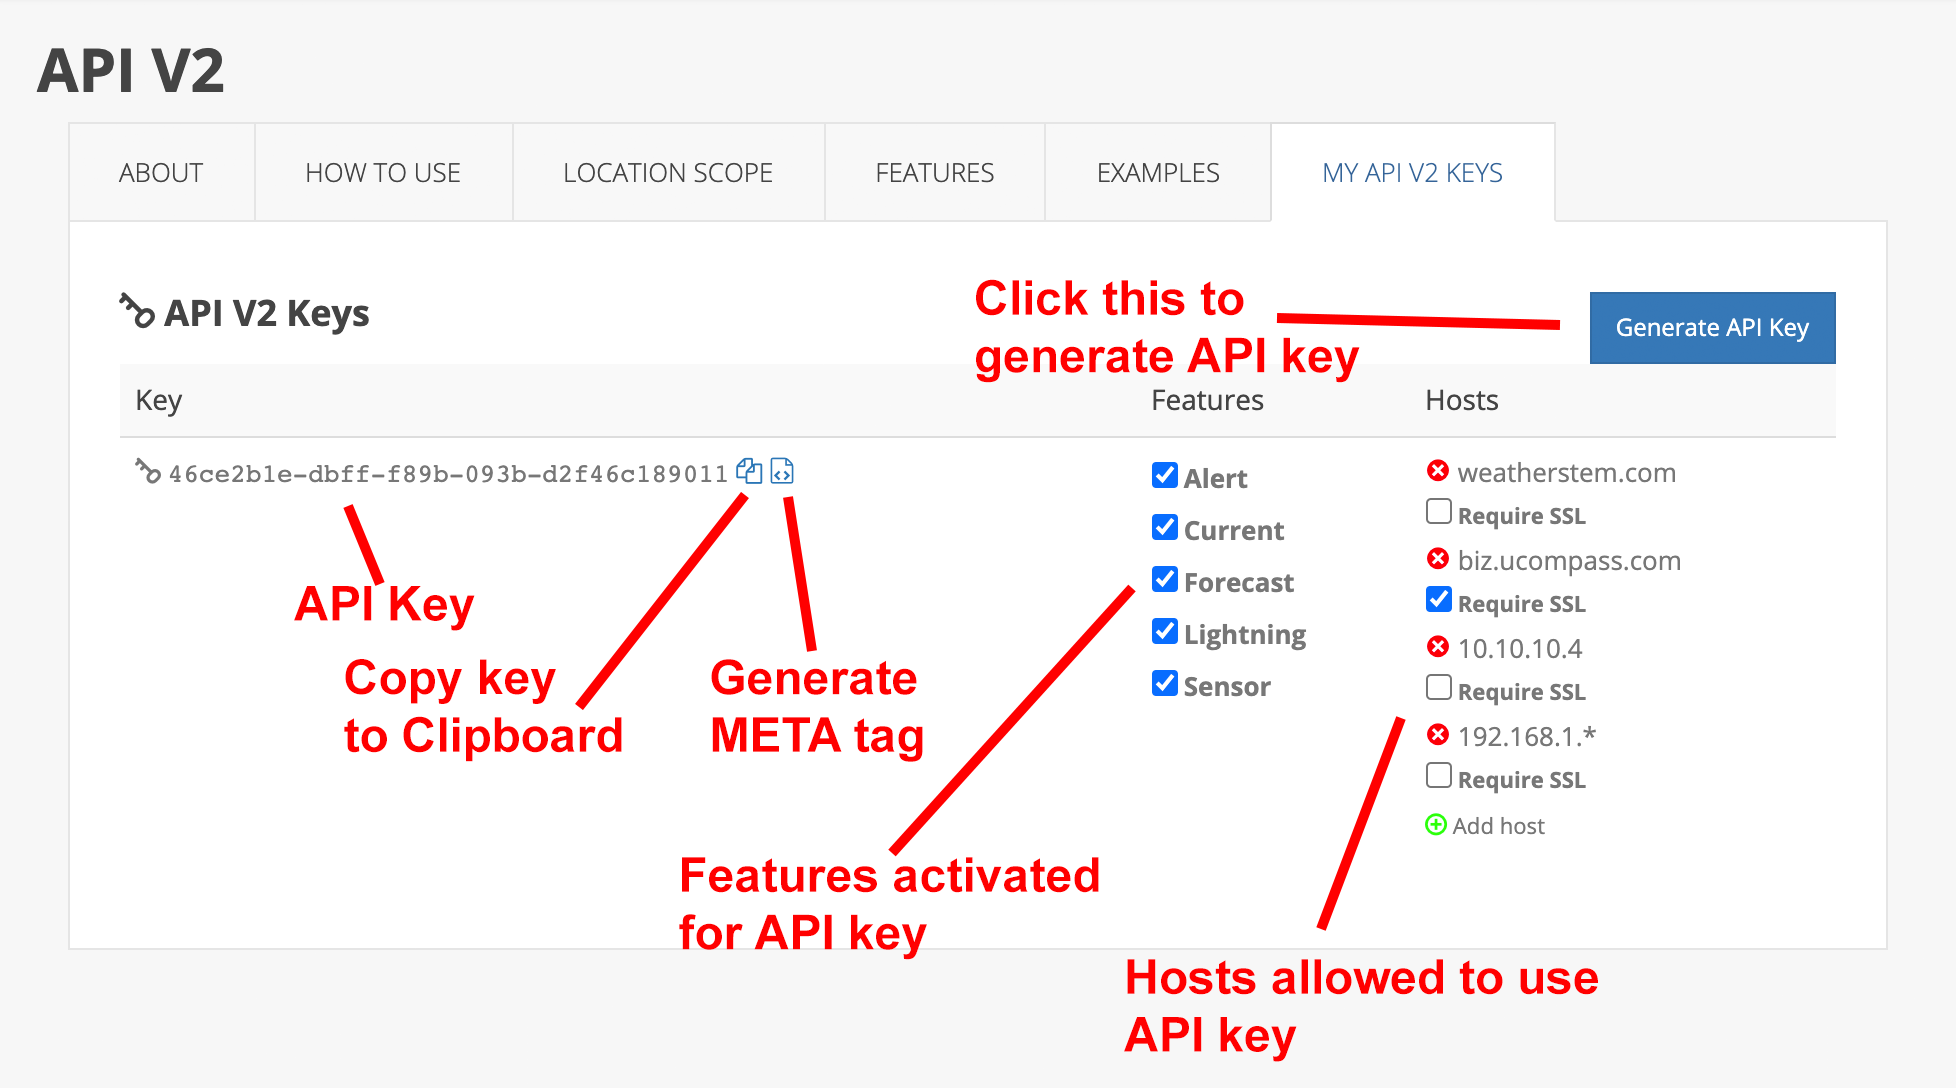
Once you have a Weatherstem account and are logged in, click the API V2 Keys tab.
Click the Generate API Key button and a new API key will be formed.
Below is an example of a fully formed API key with hosts configured and features enabled (more on that in a bit):
To delete a key, simply right-click (or CTRL-click) on it and select DELETE.
To enable the API in your content, you need to add a META tag that references your API key.
In this example, the API key is 46ce2b1e-dbff-f89b-093b-d2f46c189011.
The META tag to enable this key would be:
<META NAME="Weatherstem-api-key" CONTENT="46ce2b1e-dbff-f89b-093b-d2f46c189011"/>
The META tag should be in your HTML content after the <TITLE> element of your page but before the closing </HEAD> tag.
If you click the icon associated with a key, it will copy the API key to your clipboard so you can paste it elsewhere.
Clicking the icon associated with a key will pop up an Alert modal with the META tag you would use to activate the key.
After you've formed an API key, you need to establish the hosts that can serve content with the key enabled.
If your host is a second-level domain (host.com for instance), any subdomain of that host will be allowed to use the API key (biz.host.com, apps.host.com, etc.).
Otherwise, if your host is a subdomain (pics.host.com for instance), only that specific host will be allowed to use the API key.
You can enter an IP address as a host and you can use wildcards for the last octet, for example:
192.168.1.100Acceptable192.168.1.*Acceptable - IP addresses192.168.1.0to192.168.1.255will be allowed192.168.*.*Not acceptable
The validation of the hostname your page is loaded on against your list of acceptable hosts for your API key takes place client-side with consideration of the location.hostname property.
If you check the Requires SSL checkbox, the hostname must be loaded on an HTTPS protocol. This validation also occurs client side by inspection of the location.protocol property. At this time we are not checking the authenticity of the SSL certificate of the page.
The Features checkboxes let you specify the functionality the page that has your API key loaded is allowed to access.
We will study this in detail at the Features tab.
The key to the Weatherstem API V2 is understanding the concept of location scope.
We access the API by using specific attributes in HTML tags that unlock weather-driven functionality including current conditions, forecasts, and more.
Each time we access this functionality, we need to refer to a specific location on Earth's surface and we do this by setting the location scope in the element or one of its parents.
This is accomplished by setting the data-scope attribute to an HTML element.
A location scope can be one of the following:
Unique ID of a Weatherstem unit
Each Weatherstem unit has a web address and from its URL you can determine its unique ID that takes the form of an e-mail address.
For instance, a Weatherstem unit with a web address of https://alachua.weatherstem.com/uf would have a Unique ID of uf@alachua.weatherstem.com.
This is the Weatherstem unit that belongs to the University of Florida.
One way to see a list of all our Weatherstem units is to visit Weatherstem Dashboard.
Example<div data-scope="uf@alachua.weatherstem.com"> <!-- All child nodes will use scope uf@alachua.weatherstem.com --> </div>
Latitude/Longitude
Example<div data-scope="36.0544,-112.1401"> <!-- All child nodes will use scope 36.0544,-112.1401 --> </div>
Reference to a physical location (city, landmark, etc)
Example<div data-scope="The Eiffel Tower"> <!-- All child nodes will use scope The Eiffel Tower --> </div>
We use Google's Geocode service to translate the name of the physical location to latitude/longitude coordinates.
To set a location scope, you simply add a data-scope attribute to any HTML tag.
Any descendent of a tag with a location scope set will climb its ancestor tree and use the first location scope it comes across.
If you will only have one location scope in your page, best practice would be to set the scope in your opening BODY element.
Each feature supports a series of subfeatures that would be declared in child nodes of the element where a particular feature is activated.
<div data-feature="FEATURE">
   <span data-subfeature="SUBFEATURE"></span>
</div>
Subfeatures can be nested at any depth under its ancestor element that activates a particular feature.
data-subfeature="Icon"
Add a src attribute to the element pointing to an icon indicative of current conditions
data-subfeature="Property"
Communicates property of the referenced data-param attribute
data-subfeature="Units"
Communicates units of the referenced data-param attribute
data-subfeature="Value"
Communicates value of the referenced data-param attribute
data-subfeature="Closest Lightning Direction"
Communicates direction of closest lightning strike to scoped location in past number of seconds communicated with the data-time attribute
data-subfeature="Closest Lightning Distance"
Communicates distance (in miles) of closest lightning strike to scoped location in past number of seconds communicated with the data-time attribute
data-subfeature="Closest Lightning Time"
How long ago was the closest lightning in the last data-time seconds
data-subfeature="Property"
Communicates property of the sensor referenced in data-name attribute
data-subfeature="Station"
References the station in scope
data-attr="Camera"
With data-attr="handle" inserts img tag pointed at latest image from referenced camera
data-attr="Domain"
References the Domain of the station in scope
data-attr="Lat"
References the Latitude of the station in scope
data-attr="Lon"
References the Longitude of the station in scope
data-attr="Name"
References the name of the Weatherstem unit
data-attr="URL"
References the URL of the station in scope
data-subfeature="Units"
Communicates property of the units referenced in data-name attribute
data-subfeature="Value"
Communicates value of the sensor referenced in data-name attribute
data-subfeature="Alerts"
Create a list of alerts in effect at the location in scope
Challenge
Display a content block if a Severe Thunderstorm Warning is in effect in Miami, Florida
<div data-scope="Miami, Florida">
   <div data-feature="Alert" data-name="Severe Thunderstorm Warning">
      <span>A Severe Thunderstorm Warning is in effect!</span>
   </div>
<div>
Challenge
Display a content block if any type of Heat alert is in effect at the TIAA Bank Field Weatherstem unit in Jacksonville, FL (https://duval.weatherstem.com/tiaabankfield)
<div data-scope="tiaabankfield@duval.weatherstem.com">
   <div data-feature="Alert" data-match="Heat">
      <span>It's going to be very hot!</span>
   </div>
<div>
Challenge
Create a dynamic list of all alerts in effect at a particular latitude/longitude
<div data-scope="29.9511,-90.0715">
   <!-- This is lat/lon of New Orleans, LA -->
   <div data-feature="Alert">
      <span data-subfeature="Alerts"></span>
   </div>
<div>
The above will create a list of div elements, one for each alert, formatted as follows:
<div class="ws-alert-div">
   <a href="https://www.weatherstem.com/alert.pl?key=ALERT_KEY" target="_blank" class="ws-alert">ALERT_NAME</a><br/>
   <span class="ws-alert-expires">Expires ALERT_EXPIRES_TIME</span>
</div>ALERT_KEY, ALERT_NAME, and ALERT_EXPIRES_TIME are values returned by the API.
The service at https://www.weatherstem.com/alert.pl?key=ALERT_KEY will offer the full description of the alert in scope and all associated metadata.
Challenge
Display a block of content if the temperature is between 68°F and 72°F at my location
<div data-scope="geolocation">
   <!-- This scope will find my current location -->
   <div data-feature="Current" data-param="Temperature" data-range="68:72">
      <span>The temperature is a very comfortable <span data-subfeature="Value"></span><span data-subfeature="Units"></span>
   </div>
<div>
Challenge
Tell the user to fly a kite if the winds are greater than 20 mph in San Francisco, CA. Tell them to play golf if the wind speeds are lower than 10 mph.
<div data-scope="San Francisco, CA">
   <div data-feature="Current" data-param="Wind Speed" data-range="20:">
      <span>Let's fly a kite!</span>
   </div>
   <div data-feature="Current" data-param="Wind Speed" data-range=":10">
      <span>Let's play golf!</span>
   </div>
<div>
Challenge
Display a block of content if the Ultra Violet Radiation Index is 10 or above at my location
<div data-scope="geolocation">
   <!-- This scope will find my current location -->
   <div data-feature="Current" data-param="UV Index" data-range="10:">
      <span>
         You should have your sun screen on!  The sun is very strong right now!
      </span>
   </div>
<div>
Challenge
Display a block of content if the Chance of Precipitation will be 100% at anytime during the next week in New York, NY.
<div data-scope="New York, NY">
   <div data-feature="Forecast" data-param="Chance of Precipitation" data-range="100" data-time=":168">
      <span>
         It's going to rain sometime in the next week!
      </span>
   </div>
<div>
Challenge
Display a block of content if the Visibility is expected to be less than 1 mile during the next 10 days at the Weatherstem unit at Virginia Tech (https://montgomery.weatherstem.com/vt)
<div data-scope="vt@montgomery.weatherstem.com">
   <div data-feature="Forecast" data-param="Visibility" data-range=":1" data-time=":240">
      <span>
         Make sure you check your headlights!  Fog is expected in our forecast period!
      </span>
   </div>
<div>
Challenge
Display a block of content when lightning is within 8 miles of my location in the last 10 minutes
<div data-scope="geolocation">
   <div data-feature="Lightning" data-distance=":8" data-time="600">
      <!-- data-distance is in miles -->
      <!-- data-time is in seconds -->
      <span>
         Dangerous lightning is nearby!
      </span>
   </div>
<div>
Challenge
Display a block of content when the Turf Temperature sensor at North Carolina State University's Carter Finley Stadium's Weatherstem unit (https://wake.weatherstem.com/carterfinley) is greater than 125°F.
<div data-scope="carterfinley@wake.weatherstem.com">
   <div data-feature="Sensor" data-name="Turf Temperature" data-range="125:">
      <span>
         The turf is extremely hot.  Exercise caution!
      </span>
   </div>
<div>
Challenge
Display a block of content when the amount of daily rain exceeds 3 inches at the Weatherstem unit at Blue Lagoon Island in The Bahamas (https://bahamas.weatherstem.com/bli)
<div data-scope="bli@bahamas.weatherstem.com">
   <div data-feature="Sensor" data-name="Rain Gauge" data-range="3:">
      <span>
         Potential flooding may be occurring!
      </span>
   </div>
<div>
Weatherstem API V2 is a framework for creating and/or manipulating a web page's content based on a number of different weather parameters.
The weather parameters you can access are broken up into different categories listed below.
To activate a feature, you reference it using a data-feature attribute in any HTML element.
The API lets you hide or show content based on the existence of specific weather conditions or circumstances that you define using pre-defined HTML attributes in your various content elements.
There are feature sets available in the Weatherstem API V2:
With data-feature="Lightning" implemented, you can offer content based on proximity to lightning worldwide as reported by Weatherstem's GWDE (Global Weather Data Engine).
The data-feature="Lightning" requires the use of a data-distance and data-time attribute.
data-distance refers to the distance of the closest lightning strike within the number of seconds articulated by data-time.
Here is an example:
<div data-feature="Lightning" data-distance="10" data-time="600">
	<span>Dangerous lightning is nearby!</span>
</div>
The above directive would display the span element if lightning occurred in the scoped location within the last 10 minutes (600 seconds) within a range of 10 miles.
data-time takes a single argument, time expressed as number of seconds :.
data-time="180" would represent an event occurring between within the last 3 minutes.
With data-feature="Current" implemented, you can offer content based on current weather conditions as reported by Weatherstem's GWDE (Global Weather Data Engine).
There is an extra attribute you must declare, data-param, to use the data-feature="Current" feature.
data-param will refer to one of the following parameters:
| Param | Units |
|---|---|
|
The tag activating the Current feature supports three separate target attributes:
data-range, data-match, and data-explicit
For instance, in the example below, the content in the span element will appear if the Temperature reading is between 80°F and 90°F:
<div data-feature="Current" data-param="Thermometer" data-range="80:90">
	<span>It is comfortable!</span>
</div>
Notice the delimiter between numerical endpoints is a colon :.
You can create greater than/less than ranges as well.
For example, data-range=":70" represents any value of 70 or less whereas data-range="70:" represents any value of 70 or more.
Some parameters will offer values of type String for instance, Condition.
This sensor will offer values such as Partly Cloudy, Mostly Cloudy, etc.
You can use the data-explicit attribute to match a value exactly.
For instance, data-explicit="Partly Cloudy".
You can also use the data-match attribute to pattern match.
Consider the following example:
<div data-feature="Current" data-name="Condition" data-match="Cloudy">
	<span>There are at least some clouds in the sky!</span>
</div>
With data-feature="Forecast" implemented, you can offer content based on forecast weather conditions as expected by Weatherstem's GWDE (Global Weather Data Engine).
There is an extra attribute you must declare, data-param, to use the data-feature="Forecast" feature.
data-param will refer to one of the following parameters:
| Param | Units |
|---|---|
|
The tag activating the Forecast feature supports four separate target attributes:
data-range, data-match, and data-explicit
data-time specifies, in hours, the time range into the future you are matching.
For instance, in the example below, the content in the span element will appear if the Temperature reading is expected to be between 80°F and 90°F in the next 24 to 48 hours:
<div data-feature="Forecast" data-param="Thermometer" data-range="80:90" data-time="24:48"
	<span>It is going to be comfortable the day after tomorrow!</span>
</div>
Notice the delimiter between numerical endpoints is a colon :.
You can create greater than/less than ranges as well.
For example, data-range=":70" represents any value of 70 or less whereas data-range="70:" represents any value of 70 or more.
The mechanics of data-range apply to data-time as well.
In other words, data-time=":24" represents any time within 24 hours from now whereas data-time="24:" represents any time beyond 24 hours from now.
data-time supports an explicit numerical value, for instance, data-time="12" would represent conditions expected exactly 12 hours from now.
Some parameters will offer values of type String for instance, Condition.
This sensor will offer values such as Partly Cloudy, Mostly Cloudy, etc.
You can use the data-explicit attribute to match a value exactly.
For instance, data-explicit="Partly Cloudy".
You can also use the data-match attribute to pattern match.
Consider the following example:
<div data-feature="Forecast" data-name="Condition" data-match="Cloudy" data-time="24:48"
	<span>There will be at least some clouds in the sky the day after tomorrow!</span>
</div>
With data-feature="Alert" implemented, you can offer content based on the issuance of hundreds of different National Weather Service alerts and advisories.
Using a data-name attribute, you can target the name of a National Weather Service alert.
You can target any alert using the wildcard * selector, data-name="*".
You can also use the data-match attribute to pattern match an alert name.
For instance, suppose you wanted to match any Warning. You could use data-match="Warning".
You can use data-name and data-match together and if either directive is satisfied the child nodes will be visible.
Below is a list of the current National Weather Service alerts by name:
With data-feature="Sensor" implemented, you can access the real-time value of any sensor in the Weatherstem network and use it for display purposes or to dynamically generate content.
Each sensor on a Weatherstem unit has a unique name associated with it.
These are easy to find by visiting the website of any Weatherstem unit.
For our documentation, we are going to use the Weatherstem unit at the University of Miami which is at a web address of https://miamidade.weatherstem.com/umiami.
As you learned in the section on scope, to access this Weatherstem unit, you'd set a data-scope in a parent element to data-scope="umiami@miamidade.weatherstem.com"
To access a particular sensor, you need to know its name. See the illustration below for an example of how to find sensor names for a particular Weatherstem units:
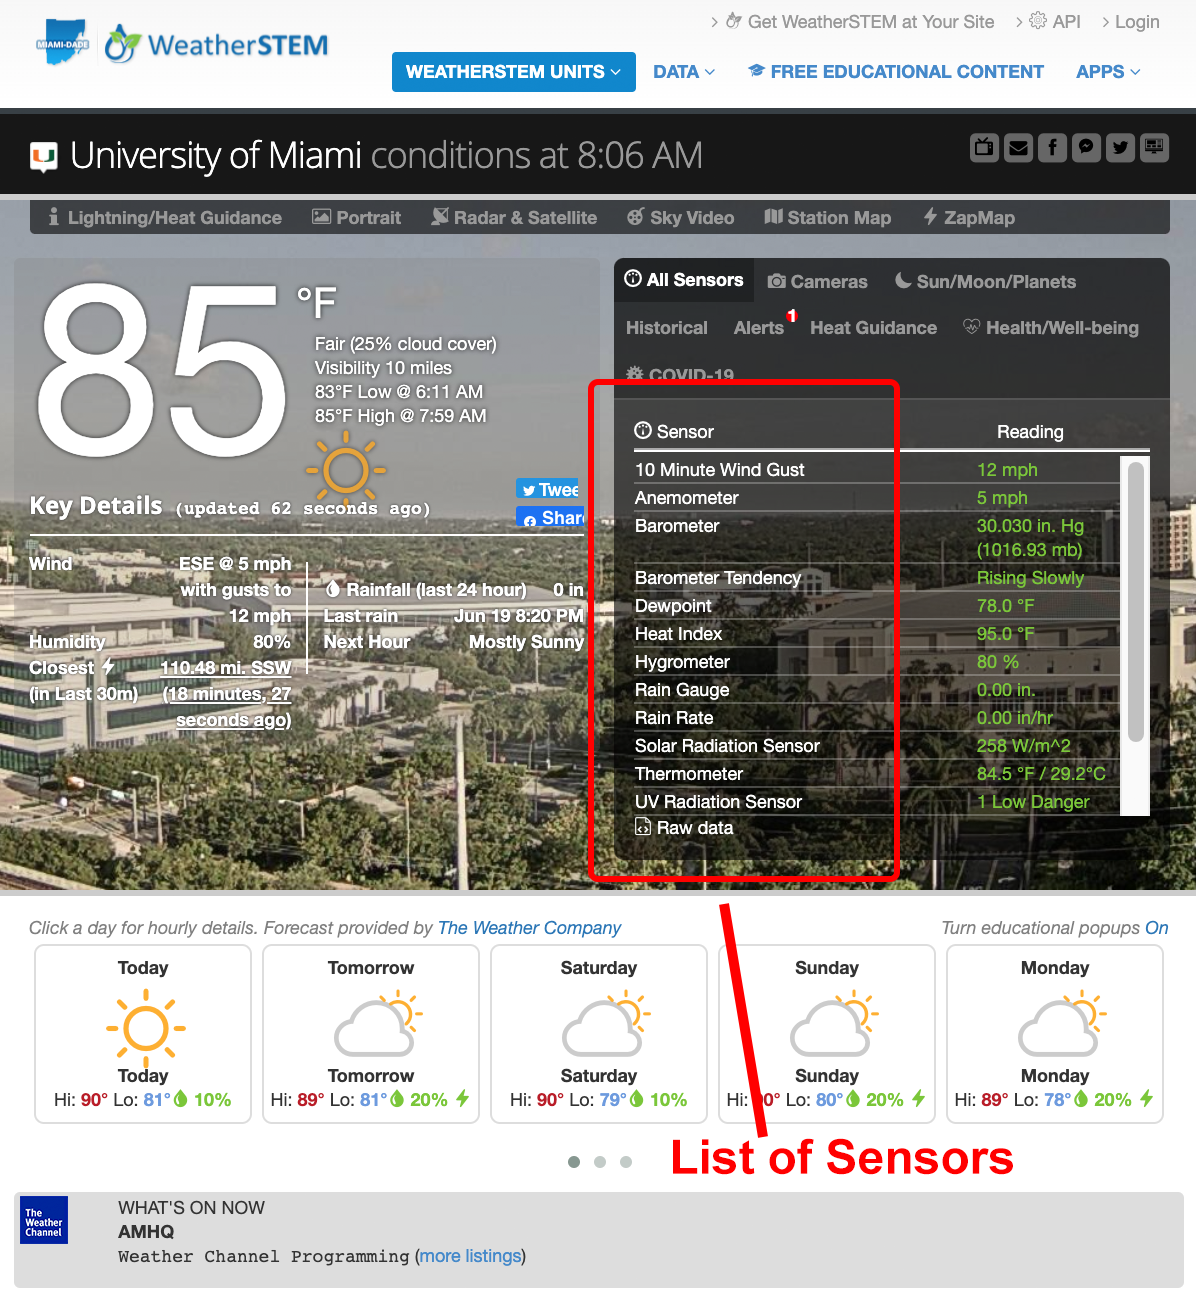
You'll target a sensor by using a data-name attribute in the tag containing your data-feature="Sensor" attribute.
An example of how you may reference the Thermometer sensor at the University of Miami is as follows:
<div data-scope="umiami@miamidade.weatherstem.com">
   <div data-feature="Sensor" data-name="Thermometer">
      <!-- Content -->
   </div>
</div>
There are several attributes you can use together with data-feature="Sensor".
For instance, in the example below, the content in the span element will appear if the Thermometer reading is between 80°F and 90°F:
<div data-feature="Sensor" data-name="Thermometer" data-range="80:90">
	<span>It is comfortable!</span>
</div>
Notice the delimiter between numerical endpoints is a colon :.
You can create greater than/less than ranges as well.
For example, data-range=":70" represents any value of 70 or less whereas data-range="70:" represents any value of 70 or more.
Some sensors will offer values of type String for instance, many Weatherstem units offer a sensor of Barometer Tendency.
This sensor will offer values such as Rising, Falling, etc.
You can use the data-explicit attribute to match a value exactly.
For instance, data-explicit="Rising Rapidly".
You can also use the data-match attribute to pattern match.
Consider the following example:
<div data-feature="Sensor" data-name="Barometer Tendency" data-match="Rapidly">
	<span>The pressure is changing rapidly!</span>
</div>
Learn more about what you can do with the data-feature="Sensor" attribute in the Examples section.